Bigfoot Country Grind Optimizations
by Rggcd
7 min read
Updated December 16, 2025 to account for the raiding retry feature.
Rank 5 or Rank 6 MG Turrets
When running BFC with Wimps and MG Turrets, the strategy is to use following formation:
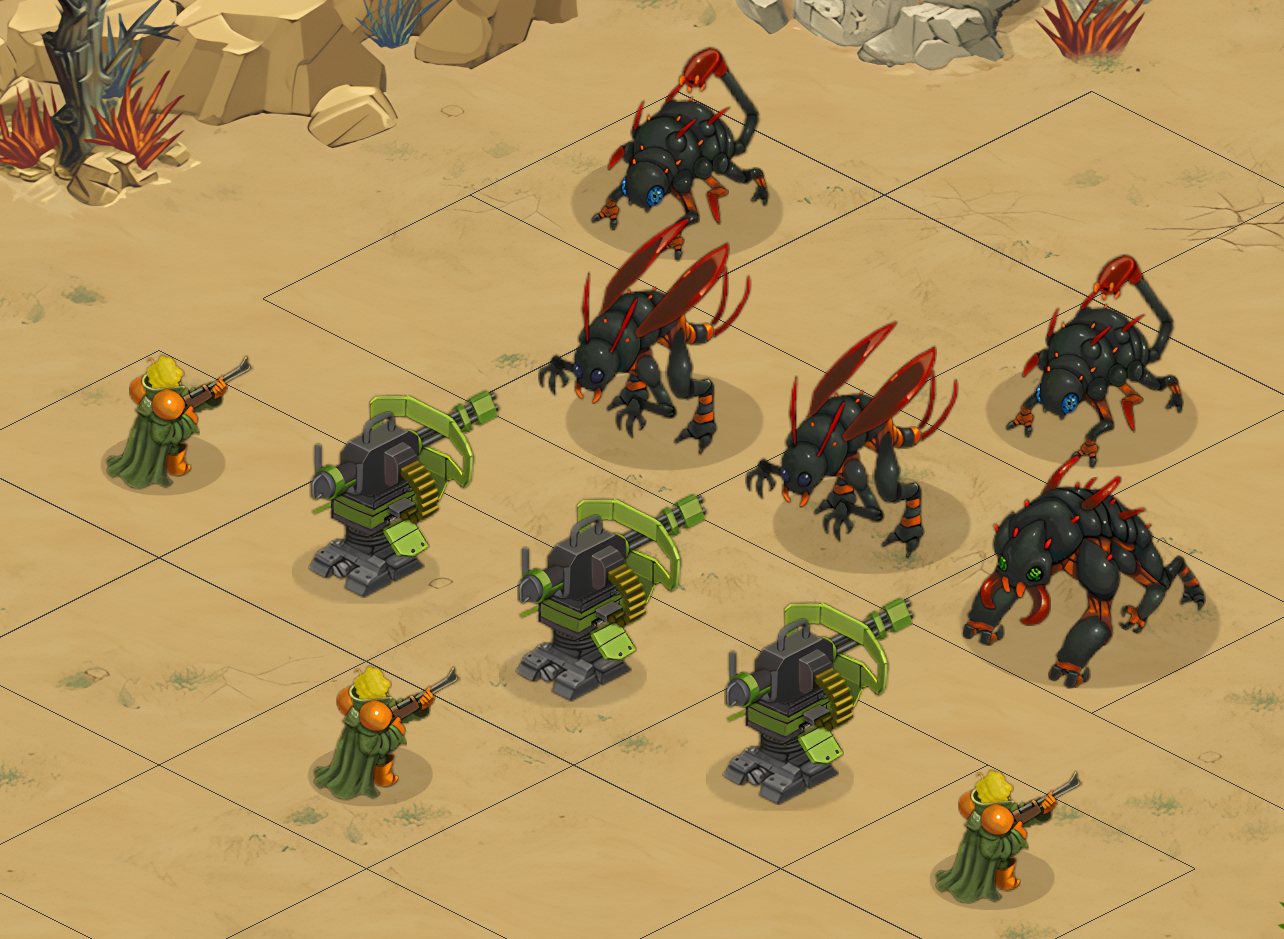
Attacking with turrets suppresses the enemies which reduces losses. I will assume the attack order is: MG Turret, MG Turret, Wimp, MG Turret. This kills all enemies in 3 MG Turret attacks while keeping them suppressed.
With R5 turrets, there is a small chance of having the Warrior be killed in two hits. This prevents the Wimp from attacking and reduces its SP earned. When going up to R6, the damage goes up, which increases the odds of this happening.
On the other hand, both R5 and R6 MG Turrets can roll low and have a 4 attack kill. This matters, but not as much as you are still getting the SP on your Wimp. As a result, this possibility won’t be considered in this analysis.
Unit Stats
| Stat | Rank 5 | Rank 6 |
|---|---|---|
| Damage (min) | 84 | 91 |
| Damage (max) | 156 | 169 |
| Armor Piercing | 25% | 25% |
| Crit Rate | 5% | 5% |
| Stat | Value |
|---|---|
| Health | 200 |
| Armor | 75 |
| Piercing Damage Modifier (Armor) | 75% |
Limitations & Assumptions
- Not considering MG Turrets being suppressed & deflecting on non-Warrior enemies
- Assuming that the Warrior has no Striker behind it
- The damage rolls are a uniform distribution
- Every damage value has equal probability
When an attack’s damage reduces the armor to zero, the overflow damage is applied to the health.
An 150 damage attack on 75 armor with 25% resistance will result in 50 damage dealt onto the health. The armor effectively requires 100 damage to break, which is subtracted from the damage, and the remaining portion is applied to the health.
Overflow Example
Riot Truck
Rank 1 Pacify: 104-156 Piercing Damage, 0% AP
Attacking Warrior
It will always break the armor since 25% resistance on 75 armor means 100 effective armor.
The armor subtracts 100 damage and leaves the rest unresisted. It does a maximum of 131 (75 + 56) damage, and a minimum of 79 (75+4). Curiously, you can never roll max damage, but you can roll minimum. This quirk is not factored into this analysis.
Since I can’t think of a formula that works to calculate the probability, I simulated every occurrence.
Testing & Results
I ran 5000 cycles of the test here, but every attack has a chance to critically hit. This was done with random number generation.
Critical hits deal 1.85x damage.
| Turret Rank | Warrior Lived After 2 Attacks | Warrior Died After 2 Attacks | Chance for Warrior to Die |
|---|---|---|---|
| Rank 5 | 24,092,627 | 2,552,373 | 9.58% |
| Rank 6 | 24,765,623 | 6,439,377 | 20.64% |
The Wimp gets 238 SP when it attacks, 159 when it only gets attacked, and 119 if neither occurs. With these values, we can determine the average SP loss from 2-shotting the Warrior.
| Turret Rank | Average SP (Wimp was attacked) | Average SP (Wimp did not get attacked) |
|---|---|---|
| Rank 5 | 230.43 (-3.2%) | 226.60 (-4.8%) |
| Rank 6 | 221.69 (-6.9%) | 213.44 (-10.3%) |
Assuming the Wimp being attacked and not attacked is equal (it’s likely not in practice), you lose on average 4% SP at R5 and 8.6% SP at R6. By ranking up from R5 to R6, you lose 4.8% SP per run.
This means that every grind you do with R6 instead of R5 MG Turrets will take 4.8% longer. Here is a table of some units with their expected run count and time spent.
Assuming an average BFC clear time of 30 seconds (from raid tile selection to getting back to the world map after winning):
| Grind | Base Run (238 SP) | R5 Avg (228.515 SP) | R6 Avg (217.565 SP) |
|---|---|---|---|
| R1 → R6 Wimp (243,940 SP) |
1025 Runs (8.5 Hours) |
1068 Runs (8.9 Hours) |
1122 Runs (9.4 Hours) |
| R1 → R6 Veteran (487,240 SP) |
2048 Runs (17.1 Hours) |
2133 Runs (17.8 Hours) |
2240 Runs (18.7 Hours) |
| R1 → R6 Mauler (634,910 SP) |
2668 Runs (22.2 Hours) |
2779 Runs (23.2 Hours) |
2919 Runs (24.3 Hours) |
| Many Units (2,000,000 SP) |
8404 Runs (70.0 Hours) |
8753 Runs (72.9 Hours) |
9193 Runs (76.6 Hours) |
Conclusion
On units like the Wimp, you may spend an extra half hour, while for units with higher SP requirements you can save over an hour. Since Boss Strike hasn’t been implemented as of this analysis being written, the damage bonus from R6 MG Turrets isn’t necessary.
R6 MG Turrets have a faster clear time if you are willing to take higher losses by attacking with your Wimp before the third turn. The strategy covered in this analysis strikes a balance between clear times and losses.
As such, I would personally recommend leaving them at R5.
The more you grind, the more you save.
(BONUS) No Critical Hits
This section show the odds if critical hits never occur. These tables represent the result based on every single possible damage roll combination.
Since these tables do not represent the actual odds, this section is a bonus.
| Turret Rank | Warrior Lived After 2 Attacks | Warrior Died After 2 Attacks | Chance for Warrior to Die |
|---|---|---|---|
| Rank 5 | 5232 | 97 | 1.82% |
| Rank 6 | 5439 | 802 | 12.85% |
Without critical hits, the increase in the odds of killing the Warrior at R6 are substantial. At R5, the odds are around 1-in-55, while at R6 they are around 1-in-8.
The Wimp gets 238 SP when it attacks, 159 when it only gets attacked, and 119 if neither occurs. With these values, we can determine the average SP loss from 2-shotting the Warrior.
| Turret Rank | Average SP (Wimp was attacked) | Average SP (Wimp did not get attacked) |
|---|---|---|
| Rank 5 | 236.56 (-0.6%) | 235.83 (-0.9%) |
| Rank 6 | 227.85 (-4.3%) | 222.71 (-6.4%) |
Resetting When Striker is Behind Warrior
When running BFC, occasionally a Striker may spawn behind the Warrior. This is problematic when using MG Turrets as you will need to spend two turns to kill it after the Warrior dies. This increases average losses and makes runs take longer. This is bad for obvious reasons.

You can retreat and reset the encounter, but does this actually save time?
There are two Strikers on the second row. Assuming that each tile has an equal chance of being selected and you cannot select an occupied tile, the first Striker has a \(\frac{4}{5}\) chance of not being placed behind the Warrior, and the second has a \(\frac{3}{4}\) chance. The odds of both happening is \(\frac{3}{5}\). As such, the odds of no Striker being behind the Warrior is 60%.
When you find an encounter with two Strikers and wish to retreat, you are wasting the time taken to realize there is a Striker behind the Warrior and resetting. The v4.12.5 update introduced the "Fight Again" toggle, significantly speeding up clear and reset times.
To reset the encounter, start the battle and retreat. As long as the toggle is on, confirming will roll the enemy formation again.
This time is roughly 4 seconds on the slow end. The expected number of failures (resets) before a success (no Striker behind Warrior) is calculated as:
\[\frac{1-p}{p} = \frac{1-0.6}{0.6} = 0.66667\]
As you reset 66.67% of the time, the average clear time goes up by 2.67 seconds.
When there is a Striker behind the Warrior, my testing shows the clear time is ~11 seconds longer. As this occurs at a 40% chance, the average run’s duration effectively increases by 4.4 seconds.
Because of the Fight Again toggle, the clear time has been reduced by ~5 seconds as there is no longer a need to raid & deploy troops again. This means the clear time is now 25 seconds, down from 30.
With the aformentioned 25 second clear time, on average, resetting increases time taken by 10.7% while fighting the encounter anyway increases time taken by 17.6%
Pre Retry Stats
When you find an encounter with two Strikers and wish to retreat, you are wasting the time taken to start the encounter, realizing there is a Striker behind the Warrior, and backing out. This time is roughly 6 seconds on the slow end. The expected number of failures (resets) before a success (no Striker behind Warrior) is calculated as:
\[\frac{1-p}{p} = \frac{1-0.6}{0.6} = 0.66667\]
As you reset 66.67% of the time, the average clear time goes up by 4 seconds.
When there is a Striker behind the Warrior, my testing shows the clear time is ~11 seconds longer. As this occurs at a 40% chance, the average run’s duration effectively increases by 4.4 seconds.
With the previously used 30 second clear time used earlier, on average, resetting increases time taken by 13.3% while fighting the encounter anyway increases time taken by 14.7%
It's faster to reset. Unless..?
If you take a long time to reset, your connection is poor, or you aren't fully focused on grinding, it's fine to not reset. The closer your reset time comes to the extra time spent clearing, the less worthwhile it becomes to reset.
The Fight Again feature makes resetting much more lucrative than before. If you want the best SP/minute when running UMG strategies, resetting is the way to go.
If you care about minimizing losses, resetting is also the best option.